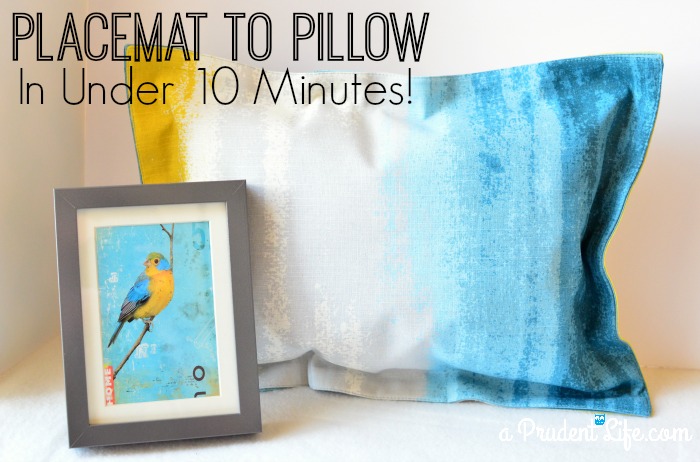
While I was supposed to be grocery shopping at Target, I found some fun clearance placemats that matched the colors of my new craft room. They were only $1.98, so I grabbed two without having an exact plan for using them. Worse case scenario I could always use them as….placemats! Please tell me you all get sucked into spending way too much time getting to the actual grocery section when shopping at Target 🙂
Although these would have been great as placemats, I realized it would be really easy to make a pillow out of them. I even had some iron-on fusing web on hand for curtains I’ve been meaning to hem for….oh….two years! I also had a cheap IKEA pillow that was losing it’s stuffing. The seam was ripped and I hadn’t bother fixing it because I wasn’t loving the color of the pillow.
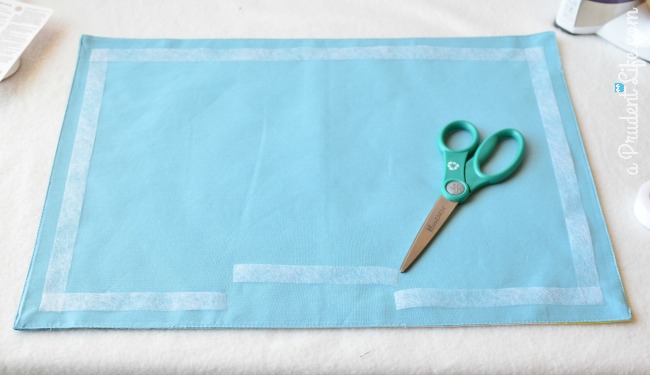
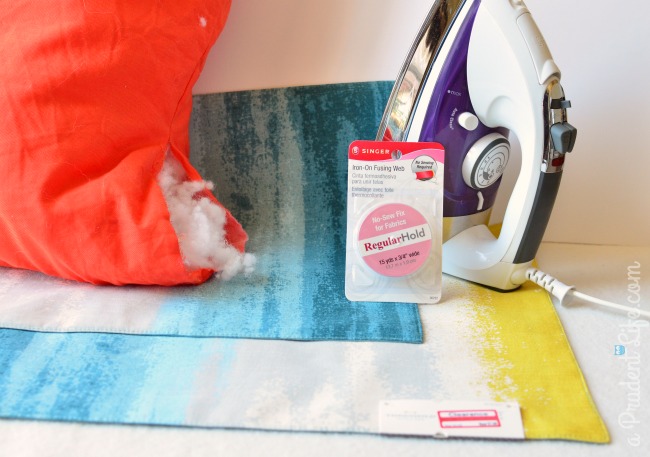 I decided to apply the fusing web about 1/2 inch from the edge to give the finished pillows a border. I cut out about six inches off the web on the bottom edge so I would have a place to insert the stuffing. Starting with a full strip and cutting out the middle gave me exactly the right amount of fusing web to seal up the pillow after I stuffed it. Make sure you move the cut out section away from the iron & your pillowcase before continuing!
 Next I put the 2nd placement on top and ironed away! The directions said to hold for 10 seconds, but these placemats were pretty thick. I had to go over most areas more than once. It still only took two or three minutes to have everything fused.
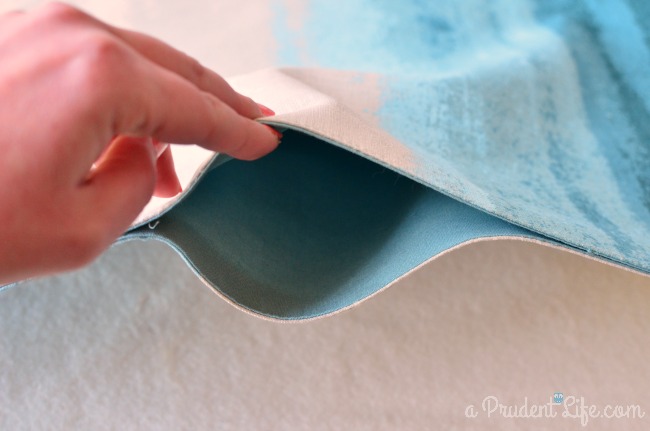
When I was done ironing, my opening was just the right size to stuff my new pillow.
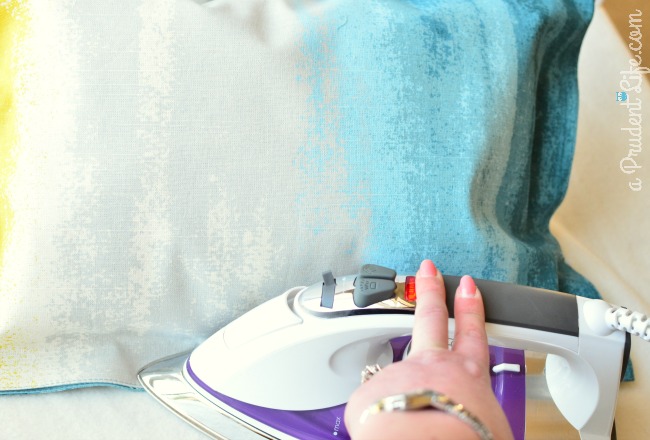
 Once my pillow was stuffed, it was time to iron the opening. I used the piece of fusion web I cut out earlier. I found it easiest to stand the pillow up at about a 45 degree angle. It was a little tricky to iron this section because of the stuffing. But by “tricky” I’m talking a 2 on the 1-10 difficulty scale while the rest of the project is a 1. So easy!
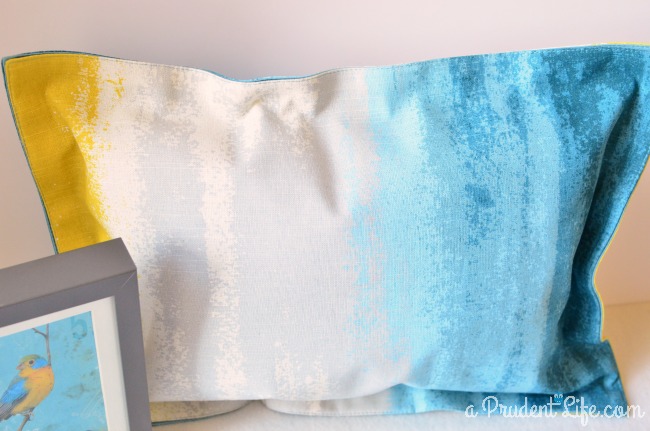
 And that is it! Here’s a close up of the finished pillow.
Start to finish the placemats were transformed in under ten minutes. For me, the cost was $4 – just the placemats. It would be a little more if you had to buy the iron-on fusing material and/or the pillow stuffing. Even with those other costs, this DIY pillow is more frugal than buying a new one!
 Isn’t that little bird cute too? He was in a clearance postcard pack at IKEA & looks great hanging on the craft room wall. See why I couldn’t pass up the placemats? They match my little birdy so well!
Don’t miss any of the craft room series!
Craft Room PLUS Guest Room – Reveal Part #1
Craft Room Organizational Details – Reveal Part #2
{Create} Art & Refinished Frame – Craft Room Project #1
Placemat Repurposed into No Sew Pillow – Craft Room Project #2
Cork Board Upgrade:Drab to Fab – Craft Room Project #3
Clearance Lamp Customization – Craft Room Project #4
3 Frugal Frame Updates- Craft Room Project #5
$30 End Table Makeover – Craft Room Project #6
Post linked up at these great parties: Hit Me With Your Best Shot, Link’n Blogs, Work It Wednesday, Craft Frenzy Friday, DIY Showcase Sunday, Link It or Lump It, Save Money Monday, Share It Sunday, Frugal Crafty Home, Twirl & Take a Bow, Show & Tell Wednesday


Katie @ upcycled treasures says
I bought this same placemat at Target on clearance after Christmas since I made holiday pillows out of placemats and loved them so much. Now I can’t help but check out the placemats every time I go to Target , haha. I need to check out that iron on fusion stuff . Thanks for linking up to The Makers!
melissa@polishedhabitat.com says
The fusion stuff is amazing! At least for people like me who try to avoid the sewing machine 🙂 Thanks for reading!
Jodie says
Love! The colors match perfectly : ) Looks much more expensive than 10 minutes and two clearance placemats to!
melissa@polishedhabitat.com says
Thanks Jodie! As much as pillows cost these days, I was thrilled to make this one on a tiny budget!
Nicole says
You had me at No Sew. I can’t believe I’ve never thought of doing this! I have the same place mats but in orange/red/gray. 🙂 This is happening. Soon.
melissa@polishedhabitat.com says
Ohhh, my Target didn’t have that color combo! Those will be awesome!
Abby @ Just a Girl and Her Blog says
Oh, Target. I always walk out with about 20 more things than I came in for! This was a serious win!! SUCH cute pillows, and you totally had me at no sew! Thanks so much for sharing, Melissa!
~Abby =)
melissa@polishedhabitat.com says
Yes, Target is totally a black hole for my time & money. But I love it anyways. 🙂
Remy says
Awesome I had never thought about it! This is a great idea. Putting my self in working mode to make a set for my home.
melissa@polishedhabitat.com says
Thanks Remy! I can’t wait to make more myself!
Susan52 says
Love this project! I’ve passed on placemats plenty of times because they weren’t quite right for the kitchen. Bet many would have been fine in another room. Thanks for the idea and your terrific instructions!
melissa@polishedhabitat.com says
Thanks for visiting Susan! I’ve passed on a ton of cute placemats too. I’m so excited to have this new option!
Tasha @ DESIGNER TRAPPED IN A LAWYER'S BODY says
MELISSA, THIS IS FABULOUS! I LOVE NO-SEW PROJECTS. I’LL HAVE TO ADD THIS ONE TO MY LIST!!!!
melissa@polishedhabitat.com says
Thanks Tasha! No-sew is the way to go 🙂
Katie says
HI Melissa,
I just love these!! I sew, but I am a big fan of avoiding it, if possible (since my sewing machine is always buried under a million other projects). Anyway … I’m planning on featuring them on Saturday at DIY Sunday Showcase! It was a tough call between this project and your St. Patty’s Vases. Love your ideas!!!
Thanks for linking up! Hope you’re having a good week!
Katie
melissa@polishedhabitat.com says
Thank you Katie!!! I’m putting my sewing machine in a more accessible spot as part of my ongoing craft room update, but I’m not sure that means I’m going to become any better friends with it! 🙂
Daniela says
Hey! Your project was featured at Link’n Blogs this week. Come party again!
http://iputabirdonit.blogspot.com/2014/02/linkn-blogs-14.html
xo
Daniela
Put A Bird On It
melissa@polishedhabitat.com says
Thank you Daniela! I appreciate it!
Megin says
Beautiful, Melissa! I love the step by step and how easy you make this seem.
Thank you for sharing this at DIY Showcase on VMG206.
~ Megin of VMG206
melissa@polishedhabitat.com says
That’s awesome! Thank you Megin!!!
Sonnet @ SohoSonnet Creative Living says
GORGEOUS! And I love the bird picture you have next to it. Amazing colors…